Monthly Archives: June 2020

The Underrot

    Summary: Underrot is a very linear dungeon that doesn’t really feel like it with how much trash in the place you get to skip. You have a lot of choice as to what specifically you skip, and almost every tank does this run a little bit differently route-wise. The only thing everyone seems to do the same in this place is when they use lust, being almost always on the first, second, and last boss. Some choose to lust the 3rd boss instead of the 2nd one on Fortified, but that’s up to your group. Some choose to take one of the final obelisks with the final boss, some don’t. As to obelisks though, most choose to take the first one to the first boss, and after that it’s random chance as to where they’ll take the other ones.

The timings in this dungeon are also very specific. You have 3 minutes before the first boss if you want 3 lusts in this dungeon, so if you have short cooldowns you can use them immediately when the key starts and have them up for the boss. After that most will pull as much trash as they have time for in the span between lust on the 1st and 2nd bosses, so ration your cooldowns in this timeframe as it is exactly 10 minutes. If you can get through all the trash up to the 3rd boss before 10 minutes are up, most pull the 3rd boss as that one will not be with lust anyway. Then go back to the 2nd boss as your lust will be back up. After that you have about 12-15 more minutes to get through the 3rd boss if you haven’t already killed it, and any obelisks and trash up to the 4th boss you need for percentage. Ration your cooldowns with this knowledge. Disclaimer – This is assuming Fortified timings and 3-minutes allotted for boss kills (which should be more than enough given Fortified kill-times are generally more around 1-2 mins). 

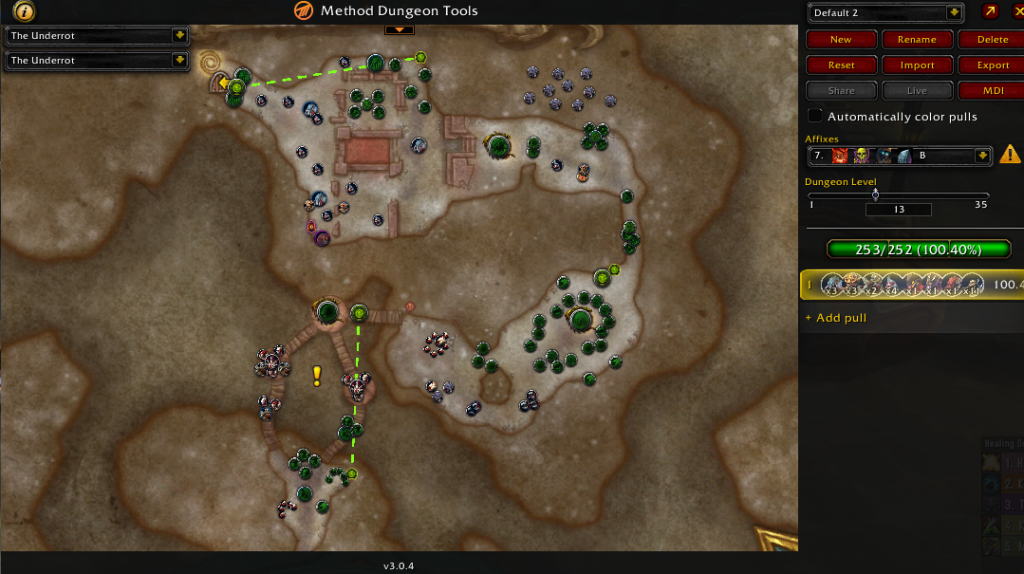
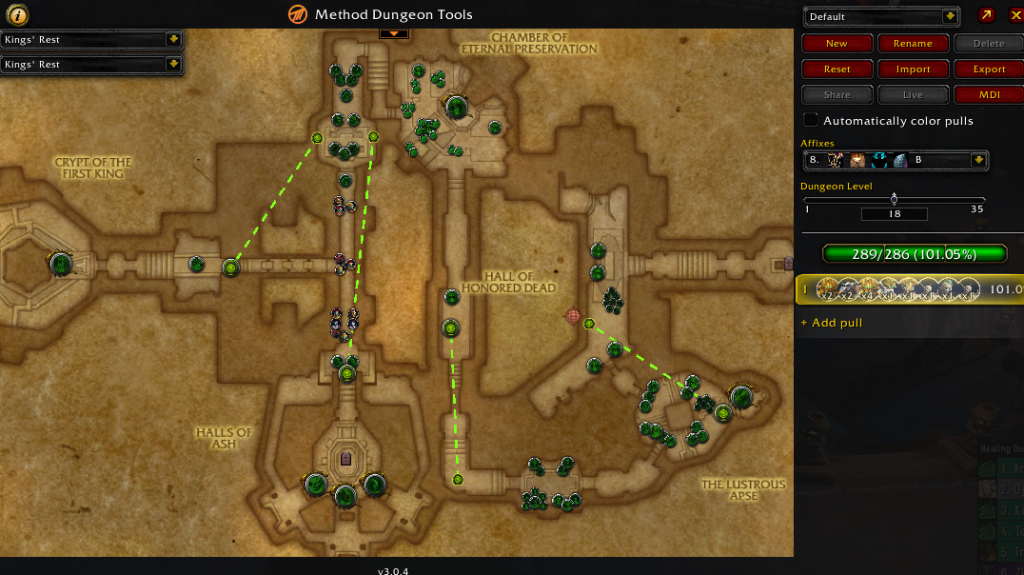
General Route Map, non-teeming. Takes Blob with Final Boss

        Trash Specifics:  

            A note before we begin, most mobs in this dungeon will appear in multiple places, so I’ll just be mentioning them in order of appearance, and any troublesome packs they appear in as they come up. 

    Fetid Maggot will do a frontal cone that’s more of a very long line spew of bad. Watch to not be in front of this mob, and if you can, stun this mob to interrupt its cast. Any cc works with this mob too, Like Imprison or Sap. This mob is not as important to stun as certain other mobs you can pull with it later, just watch its frontal cone. The Chosen Blood Matron will dash to a chosen player and do a cartoonish windup before doing a frontal cone of damage. To not stand in this attack, watch for where the Matron is standing when DBM tells you she’s casting Savage Cleave, or if you see her dash quickly to a player. If you’re targeted with this, sidestepping the frontal is the easiest way to get out of it. The Devout Blood Priest will be constantly casting, so any prolonged silence on this mob would be useful. The most important thing to kick on her is her Dark Reconstruction, which fills her health bar back to full. This is cast preceded directly by Gift of G’huun, which puts a 20-ish second buff on one of the other mobs you’re fighting her with. This buff can be consumed if the Priest gets her cast off.  This buff prevents the mob it’s on from dying, and increases their damage done by 100%, so it’s very important to consume if it does get off, and if your party does not have a consume class it’s much more important to kick.  

The Fanatical Headhunters will periodically root players for 4 seconds, doing some small damage to them. You could probably stun this but it’s not too important. Underrot Ticks should be burst down with AoE, unless you’re in Bursting week. Pull them on their own because they do a small bleed that starts to start to hurt if they stay alive too long. The final mob before the first boss is the Befouled Spirit. We used to pull this all the time, but we tend to skip the packs with these in them now with the obelisk. Still, for prosperity’s sake I’ll discuss what they do. If you ever pull a pack with one of these, they are the focus target because they do a single-target channeled DoT on a random player and every once and a while do damage to the whole party. Any player targeted with the channeled DoT (Dark Omen) should use a defensive or shadowmeld it off if they’re too low on HP.  

Generally, after the first boss people thread the needle between the Fetid Maggot pack on the left and the large pack on the right, but if you want you can pull either or both of those packs. On Teeming you need stealth or VERY good timing to thread the same needle, as both of those packs are multiplied by teeming. I’d recommend either pulling one of those packs (Preferably the Fetid Pack as in my opinion it’s easier) or having a rouge cloak the group through or just using stealth pots. After getting past those packs you will enter the 2nd boss room, with multiple new enemy types. 

Living Rot functions in a similar way to Embalming Fluid in Kings’ Rest, as it spews green bad on the floor in swirlies that then go away, and more permanent green bad under it. Stay light on your feet and you’ll be fine, though do watch for back-pulling more of the room when killing the first 3-pack of these mobs. Diseased Lashers have one ability, but it’s a nasty one. Called Decaying Mind, the lasher casts it every once and a while and if it’s not kicked it will silence and stun the player it’s being cast on for 30 seconds or until dispelled. Because of this I’d avoid pulling more than 2 at once in any pug, as any overlapping kicks would likely spell a wipe on more than 2. There is a 3-pack that some pull, and it’s entirely possible and even easy with good communication, but without it it’s a gamble. The final new mob in the 2nd boss room is the Feral Bloodswarmer, which has two abilities. First is Sonic Screech which interrupts any channeled ability or spellcasting. Second is Thirst for Blood, which will focus a random player and follow them, with any melee attacks this mob does to the focused player dealing a stacking DoT. Stuns, slows, roots and snares, as well as many cc effects like Imprison or Sap will stop this mob from hitting its target. Always focus this add first and try not to pull more than 1 at a time, 2 if absolutely necessary. If your group has cooldowns and wants to pull big, use stuns or roots to mitigate this mob’s ability to cause harm. I’m not sure if other cc effects do this but Imprison will often force the Bloodswarmer to swap targets, so if it’s on someone with low health that might be a good thing to use. Also – a note to if you’re running away from this Swarmer, DO NOT leap away, it will just charge you. If you can, use your movement abilities to stay just out of range of it, and keep moving.  

There are 3 packs throughout this dungeon with 1 Fallen Deathspeaker and varying 3-5 Reanimated Guardians. They’re generally easy so I’d recommend pulling all of them cause they’re good for percentage. A mass silence would be good for this pack given they all use interruptible casts. The Deathspeaker will periodically summon more Guardians with Raise Dead, so kick that. And the Guardians will cast Bone Shield, which can either be kicked or consumed after it’s cast, though consuming that is generally a waste of time as it’s a very small shield. Another thing to note is the Fallen Deathspeakers’ enrage that he casts. It’s uninterruptable, but it is stunnable though he will end up just trying to cast it again most of the time. If you have a druid or hunter who can sooth this is a non-problem. If you don’t, just try to focus down the Deathspeaker and maybe stun the enraged Guardian to help out your tank. The Grotesque Horror spawns from blood pools on the floor and will not move. It constantly casts Death Bolt, and only pauses for a bit when kicked. It can also be stunned, but that will simply make it start right back up casting when the stun wears off. Bloodsworn Defilers are debatably the most annoying mob in this dungeon. Shadow Bolt Volley and Withering Curse need to be interrupted, and these mobs cannot be mass silenced. This means very specific coordination needs to be employed to get all these casts kicked, especially on the 2-pack of these before the 2nd boss. On Teeming this pack also comes with a Fallen Deathspeaker, so your group will have to watch casts on that mob too, though less important than anything the Defilers cast, Raise Dead can be an annoying time-sink that (I’m almost positive) doesn’t give percent. Summon Spirit Drain Totem can be kicked but it’s a fast cast and with all the other kicks on these mobs I’d just let it go out and then run away from the Totems before they go off. Outranging the Spirit Drain Totem is surprisingly easy, it’s only about a 10-yard range so simply backtracking a bit will do the trick.  

The only new trash mob after the 3rd boss is the Faceless Corruptor, who has two main that cannot be stunned or kicked. These are Maddening Gaze and Abyssal Reach. The former is a narrow cone (more like straight line) in front of the mob that players must step out of. Sadly, the tank cannot simply point him away from the group, as he faces one of the players at random to cast this. Simply side-step this ability and you’ll be fine. Abyssal Reach spawns multiple tentacles near or at players’ feet. These tentacles will slam the ground towards the closest player, but it’s AoE is quite small. Just step out of range of the tentacles when they go off. If correctly done, these Corruptors can be very easily turned into an easy dance where everyone stacks together for Maddening Gaze, goes behind the adds, and then when Abyssal Reach goes out they all come back together away from the tentacles ready for the next Gaze cast. Thankfully the final two-pack of these sync up well together cast-wise, so you can just do mechanics as if you were dealing with only one of these mobs.  

If you try to enter the final obelisk on the south side of the room instead of taking it with the last boss, there is some tricky placement with a Grotesque Horror, a Bloodsworn Defiler, and a pathing Faceless Corruptor. If your tank is not careful, he will wait for the Corruptor to path away and then pull the Horror and Defiler, and your group will likely not get those down before the Corruptor gets back, automatically chain-pulling that and maybe wiping your group. It’s important for your tank to pull the Corruptor first, without pulling the Horror or Defiler (if you’d like you can pair this with one of the Horrors outside that corner that’s okay, just be careful about kicks) and once those are down you can pull the Horror/Defiler pack before that obelisk safely. 

Also, just a general note – be careful when pulling any Horror with a Defiler, as both need constant babysitting in the form of kicks that if you miss will start seriously hurting your group. Mass silence and stuns do work on the Horror but not the Defiler, so if your tank pulls both maybe just slap the Horror with a stun or silence of some sort and focus down the Defiler.  

        Affixes Effects:  

    Once again, Tyrannical takes the cake here as the more annoying of the two options for the first affix slot. Elder Leaxa is still a joke, but Cragmaw and Sporecaller can be team-breakers depending on whether your dps know mechanics and can bring themselves to stop dps for 2 seconds to do them. Abomination in my experience is less bad of a fight, but if anyone in your group stands in the wrong place it can wipe you. Though, in my experience if you can get through the middle two bosses your group is probably good enough to finish the last boss without too much trouble. For the second affix slot, I think the most annoying are the usual suspects, Bolstering and Bursting. Though maybe weighted a bit more towards Bolstering, as it makes big pulls a bit more tedious and chain-pulling the 2nd boss room is way too fun to not do. The only Bursting pack you need to worry about is the Underrot Ticks, and just dropping Darkness or an immunity can get you past that if your group refuses to stop dps. If you end up doing this on Teeming your biggest concern is the ‘thread the needle’ after Elder Leaxa. If you choose to pull the 4-Fetid Maggot pack, do watch where they’re pointing and use stuns liberally. Tanks if pulling this pack will likely want to pop defensives. Teeming doesn’t mess with this dungeon too much more than that, to the best of my knowledge. Just watch your percentage, as it is always with Teeming.  

The rank 3 affixes generally follow how they are on the rest of the dungeons, nothing in this dungeon really makes any of those much worse than they already are. Of course, Grievous and Necrotic are generally accepted as the worst, but nothing in this dungeon exacerbates these problematic affixes too much. Just watch your damage taken and be liberal with defensives on the 2nd and 3rd bosses, especially if you’re running on Grievous week. Obelisks are generally placed okay in this dungeon, and I like that it makes us explore the south-west corner before the 4th boss we’d never really had any reason to go to. It’s entirely feasible to take an obelisk with the last boss, maybe even on Tyrannical, depending on the key level and your tank. Most take the south-west corner obelisk, only taking a different one if it’s the fear boss instead of the blob or spider.  

Bosses:

        Elder Leaxa 

            This boss is the easiest of all the bosses in this place. She has 3 mechanics and none of them are threatening, really. First is Blood Mirror where she spawns a clone of herself. Just cleave that down, no need to focus it. Next is Sanguine Feast – Don’t stand in the red around the boss when this goes off. Finally is Creeping Rot – watch for the green stuff and don’t stand in it. It moves at a snail’s pace though so don’t worry if you’re initially in its way, you’ll probably be able to sidestep it with minimal difficulty. Oh, and you can kick Blood Bolt if you feel like it. I genuinely don’t think there’s any good reason to kick this. Let me know if this actually hurts on higher Tyrannical keys.  

        Cragmaw the Infested 

            This boss’s major abilities all stem from its central mechanic – spawning blood ticks. The boss will charge a random player, cast Indigestion as a frontal cone, and every once and a while cast Tantrum, all spewing out small grubs that must be stepped on to be killed. If not stepped on, they will eventually do a short bubbling animation and then turn into Blood Ticks. You can have everyone stand between the boss and a wall to bait his charge – but that’s not necessary to kill this thing. As a dps or healer, try to save movement abilities for his Tantrum phase and each grab a slice of the room to cover for Ticks. As a tank you should also do that, but also make sure to bring the boss to any remaining blood ticks whenever possible, like for Indigestion and Charge. This will make it much more likely any dps will be willing to go and walk over the ticks before they spawn. This is a simple fight in theory, but if you don’t get the blood ticks down fast, they will kill your tanks with bleeds. Even if just one is up, focus it down before getting back on the boss if you can. This fight can get out of hand fast, do don’t be scared to stop dps to do mechanics. Oh, and don’t stand in front of his charge or frontal cone, those do hurt. Wait till they’re done to squish ticks.  

        Sporecaller Zancha 

            This guy’s entire fight consists of him spawning green mushrooms around the circumference of the circle in his boss room, and us trying to get rid of them however possible. The fight goes through cycles; the cycle starts when he summons mushrooms and ends when he casts Festering Harvest. Between his initial summoning of mushrooms and the Harvest cast you have about 2-3 of the tank clear ability (Shockwave), and 2-3 casts of Upheaval from the boss, targeting two random dps with their clear ability. You may have different amounts of Upheaval and Shockwave for the first or second cycle comparatively, because Shockwave and Upheaval are on different timers than the summoning of mushrooms and Festering Harvest, making it not line up perfectly. Festering Harvest will then have him channel sucking up all the mushrooms and for each one not destroyed he will put a DoT on the entire group as if everyone had run across the mushrooms.  

Because his cast basically makes the damage across the raid group 5 times more than if one person had run over the mushrooms to destroy them, it’s generally good for people to run over any remaining mushrooms before this cast goes off. Be aware this hurts a lot, so either only take 2-3 mushrooms with a mild defensive or go full out and immunity walking over all the mushrooms. Something additional to mention about Shockwave – it is a frontal cone that does hurt players, and the tank must stand in it; so, watch the front of the boss and don’t stand there if you’re not the tank. The final mechanic to mention would be Volatile Pods for which he summons balls that float across the room in straight lines. It’s useful to orient your camera directly above your head for learning this mechanic, as there are a lot of balls coming at your character from all directions. After you’ve learned this a bit better you don’t strictly have to use this bird’s eye view, but it is helpful.  

        Unbound Abomination 

            This boss is certainly odd in the way we kill it. He cannot be damaged directly, as all damage we do to him goes into increasing his blood bar thingy, which makes him summon Blood Visages. Titan Keeper Hezrel will kill these given about 5 seconds, so we as players really don’t need to worry about downing them. Each one of these Visages killed results in 17% of the boss’s health being knocked off, and multiple Blood Visages spawn every time we fill his blood energy bar. This means that we need to fill his energy bar about 5ish times, with the last time you fill it before he dies always happening at 29%. The next mechanic this boss has is that it applies a stacking DoT called Putrid Blood to the party members, which can and should be cleared by everyone standing in the Cleansing Light circle targeted on a random player. DO NOT try to clear the floor with this ability if you are targeted with it. Stack on the tank and wait until it goes off.  

Vile Expulsion will do a very large cone of bad in front of the boss, facing a random player. After casting this cone, he will also randomly drop pools of bad where players were standing when he was casting. Because of all this, the accepted strategy is for everyone to stack on the tank, with the boss facing at an angle towards the outside of the room. Then, when he casts Vile Expulsion he will stay facing at an angle towards the outside of the room – at this time the group should move though his legs to avoid the initial cone. After he’s done casting, the tanks should move the boss out of any remaining stuff and face him back towards the bad he’s just put on the ground. Everyone should stack back up with the tank, and the process repeats. Generally, everyone should try and stay in melee range to make this and the Cleansing Light circle work. If you’re at range, it’s likely you’ll either get no heals or stand in bad.  

An additional note for if you end up doing this with an obelisk. Make sure you’re focusing down the obelisk boss first, but also make sure you keep doing the dance I described for the main boss just now. If you let the obelisk boss distract you or disorient you, it can spell a wipe. The only Obelisk Boss that makes this too much harder is the Blob, for which you kind of need to keep moving. My best advice with this one is to watch your DBM timers and make sure you’re stacked on the tank (or close to him) when Vile Expulsion starts casting. If you get the blob down fast though, this doesn’t end up being too much of a problem. Just stay nimble and you’ll be fine.  

Kings’ Rest

    Summary: Kings’ Rest is a very linear dungeon, and thus has very few routes. You can kill everything you come across until the bridge and use the wall trick to activate the bridge and use the two obelisks to skip the entire bridge. Or, you can skip certain constructs at the beginning and on the bridge after the first boss and pull the pack in the middle of the bridge by itself by skipping there with an obelisk. I tend towards the first, as it’s easier and you have to deal with less of certain enemies.  

Teeming Route Map

        Trash Specifics (very in order): 

            Before first boss 

    Animated Guardians will do a frontal cone of lightning called Suppression Slam, which will stun you when it goes off if you stand in it. It does not hurt for you to stand in the crackling lightning on the floor after it goes off, so feel free to dance into that if necessary. The Minions of Zul are small mobs with all their health as a shield that is consumable. Once consumed, they will die instantly. They fear on contact with the player. These do bolster and burst, so watch for that. Bursting is the worst affix for these mobs, given it’s generally a mad rush to get them all dispelled. If you do enough damage to them they will also die – but be mindful of the fear. The second pack of these is in the first boss room and will do a full circle of the boss room starting in the left corner (from the perspective of the balcony looking in) and ending in the same place, briefly pausing in each group of mobs. Watch bolstering or bursting on these, as they will bolster the absolute heck out of the other mobs they’re pulled with if they are pulled with other mobs. It’s best to pull these by themselves and have a solid plan on how to dispel them.  

The Shadow-Borne Champion does a frontal block of all damage, hit it from behind to hurt it while this is channeling. It also has an enrage that is not kickable, needing either a sooth or cooldowns on the part of the tank to take the damage. The Shadow-Borne Witch Doctor is constantly casting, mostly Deathly Chill and everyone and a while a Shadow Bolt Volley. Shadow Bolt Volley is the more important interrupt, but the best thing here is to have a kick rotation that stops the Witch Doctor from casting anything if it can be helped. If lacking on interrupts though, make sure Shadow Bolt Volley gets kicked. Mass silence does not work on this mob, if timed right it works as a single-target kick on a very long cooldown. The Shadow-Borne Warrior has only one ability, Gust Slash. This creates a small tornado that swirls in circles on the floor. If you get hit by it, it knocks you out of the way and does not insubstantial damage. On Fortified getting hit by more than two of these in a row is a death sentence, so watch your feet.  

            Before second boss 

    There are 4 packs in a room after the first boss, each with their own mini-boss mechanics. They spawn in a random order each week. Queen Patlaa and her Raptor spawn in the far-right corner of the room, from the perspective of walking in the door from the first boss room. Be careful when getting aggro on these two, they seem to become aggroable slightly staggered, so if you’re not careful and meme beam right out of the gate you may get one shot. Give the tank extra time to get aggro on everything in this room. The Queen will shoot and create dark circles on the floor, get out of those if they’re on you. The Raptor will jump around to different people and start channeling a frontal cone called Hunting Leap. Stay away from the front of this Raptor when it’s channeling this, if you stay in this for more than 2 seconds you will die. The next pack is Queen Wasi and King Timalji. The Queen does a constant cast of shadow bolt, which isn’t that important to be interrupted. She also casts Seduction infrequently, taking control of a random player. Stun the player effected but do not kill them. Unlike with the sisters in Waycrest killing your teammate here will not break them out, so leave them be. The King has only one ability, called Bladestorm, with which he pursues a chosen player slowly, doing an AoE attack on his way to them. If you stand in this effect for more than 1 second you will likely die, so be very careful around King Timalji.  

Next up is a 3 pack – King Rahu’ai, Seneschal M’bara, and Guard Captain Aru. M’bara will cast a heal called Induce Regeneration on the King, watch for it and kick it. The Guard Captian will cast Axe Barrage, so use a defensive if you get low. Finally, the King will cast Channel Lightning, which will kill you if you stand within 10 yards of him for more than 1-2 seconds. This can be interrupted with anything like Typhoon, Grip, Sigil of Chains, or Ring of Peace. If you aren’t positive someone is going to stop his cast, get out. The final pack in this room is King A’akul and five Bloodsworn Agents. The King casts Hidden Blade, which does noticeable damage to the player it’s on and drops green bad on the floor. The Bloodsworn Agents will periodically cast Shadow Whirl, jumping to a player’s location (denoted with a purple swirlie) and waiting for just a moment before doing an AoE attack there. It’s important to watch your feet on this pack, both for the green the King puts down and the purple swirls that indicate an Agent is going to jump there.  

The Purification Construct is found in the hall between the first and second bosses, and on teeming week there’s an extra one in the second boss’s room as well. This construct does Purification Strike, putting bad at the tank’s feet, and Purification Beam, turning in one full circle (always counterclockwise). When faced with the decision to get hit by the Beam or walk through the Strike’s bad on the ground, always walk through the stuff on the floor. The Beam does a DoT that will likely either kill you or test your healers’ patience, both very bad things. The Internment Constructs found in the second boss room will Entomb someone, which is the same mechanic as the boss. If held next to where they spawn, these constructs will always Entomb people in the same casket, the one closest to the entrance wall. It’s important to get people out of their casket quickly, because the Construct will begin casting a party wide AoE spell if they’re not released, called Wail of Mourning.  

The final mob to worry about before the first boss is the Embalming Fluid. These blobs will spew out green bad, on people, on the floor, all over the place. Best tactic here is to get aggro on all of these, then kite them slowly while the dps kill them. Any slow effects work wonderfully here, making the kiting of these blobs even. If on Necrotic week some form of RoP, Typhoon or Roots could potentiall be helpful for the tank to get stacks off. These blobs will also drop bad on the ground when they die, which disappears after about a minute or two. The only reason not to chain-pull these mobs is on Bolstering, and even then, if your dps can kill them all generally evenly it shouldn’t be a problem. Pulling style should vary though. For example, on Bursting you should pull 3, wait until they’re all about 25% health, then pull 3 more. Dps should know to focus down the low health adds. If you have no worrisome affixes like those, just chain pull and meme beam your heart out, while of course watching for stuff on the floor.  

            Before third boss 

    The Spectral Hex Priest is constantly casting Spectral Bolt, which does noticeable damage to your tank. A mass silence would do nicely here. They also cast Hex, turning a player into a small dino with the same mechanic as the Witch Doctors in Atal’Dazar. Spectral Berserker’s will cast Severing Blade as a stacking bleed on your tank. Because of this you want to focus down the Berserkers anytime there’s a pack with them in it. They will also cast Bloodied Leap, jumping to a player’s location (denoted by a purple swirl) and doing an AoE attack. If you stand in this, you will likely die. Spectral Witch Doctors will cast a Healing Tide Totem, which is only affected by physical attacks and either needs to be outranged or killed or enemies within about 10 yards will be healed over time. The Spectral Brute has only one attack, a ground crush with a very large effect zone. Either dodge in and out of melee with movement effects or stay at range if you can. On Teeming the very first pack in the hallway directly after the second boss should be LOS’d around the corner and killed there to avoid the pathing Brute teeming puts there. 

The Spectral Beastmaster and Honored Raptors always come in a pack together. The Raptors will leap at a targeted player and do a frontal cone that does a lot of damage. This ability can be stunned or cc’d, with RoP and Typhoon working wonderfully. The Beastmaster will shoot at the tank, occasionally stopping to use Poison Barrage on a random player. This player should try to make sure no one else is in a line between them and the Beastmaster. Also – if you’re ranged you can out-range this ability at about 15-20 yards. Spectral Headhunters have no special abilities to be worried about, and only really feature in the large pack before the third boss that most don’t pull.  

After the third boss there is only the Shadow of Zul, but he is very much not to be trifled with. On Fortified and/or if you have a tank without very good magic damage mitigation (bear, monk) this can be harder than the final boss. He has three major abilities. First is the damage he does to the tank, called Shadow Barrage, which is a stacking magic debuff. Second is a pool someone must soak, generally a ranged player. If not soaked, this does party-wide ticking damage. Third is Dark Revelation, where someone gets a very large fire circle around them and must run to the walls, away from the other party members. When this goes off, they can go back to the boss but do watch for the Minion of Zul that spawns from where they were standing, it’s important to dispel it before it fears someone important like the tank or healer.  

        Affixes Effects:  

    For Kings’ Rest of the first two affixes Tyrannical takes the cake. The final boss absolutely destroys tanks. However, Fortified isn’t too much better with the Shadow of Zul hurting almost as much as a Tyrannical Dazar. If it’s Tyrannical, watch the Gold on the first boss, and lust the axe phase on the 3rd boss. If it’s Fortified, you may want to seriously consider lusting Shadow of Zul instead of the 3rd boss. Other notable affixes are Bursting for the Minions of Zul and Bolstering for both the Minions and the Embalming Fluid in the 2nd and 3rd boss room respectively. Teeming doesn’t affect this place too much, just an additional Purification Construct in the 2nd boss room and another Brute in the hallway before the 3rd boss. You can still skip the whole hallway, so it’s not too much of a concern.  For Raging focus sooths on any mob that already hit hard, like the Shadow-Borne Champion, and Sanguine just means having Typhoon or some form of Grip or RoP to get stubborn casters out of puddles.  

For the 3rd level of affixes there aren’t any that overly affect this dungeon, other than Necrotic being a problem with very little space to kite certain packs, like the last pack I mentioned in the room directly after the 1st boss. Trees or Typhoon are invaluable here. Explosive is the only affix that would change the pulling strategy too much, and even then, it’s only for the 2nd boss room’s Embalming Fluid. You’d probably want your tank to pull in a similar manner to Bursting, pulling 3, waiting until they’re almost dead, and then pulling more. This is to keep the number of orbs that spawn down to a dull roar. You could also just pull all of them and use big cooldowns like Darkness or Tranq, but that’s up to your tank. 

Obelisk placement in this dungeon is near-perfect in my opinion, mostly because you don’t have to pull anything you wouldn’t normally pull to get to them. The two obelisks in the hallway allow for many different strategies for that normally troublesome hall. You could probably get away with skipping an obelisk (preferably one of the first two) and doing it with the final boss on Fortified, but on Tyrannical I would advise strongly against it. Just make sure to focus the obelisk boss before the final boss gets to 80% and summons his first raptor, and you’ll be fine.  

Bosses:

        The Golden Serpent 

            The major mechanic on this boss is Spit Gold, and where you drop it matters a lot. My best experience on this boss tends towards having the tank hold the boss at the bottom of the stairs of the balcony and having the dps drop gold as far back on the balcony as possible. On Tyrannical I’d recommend using a defensive when dropping gold, it hurts quite a lot. Also, if you need to, use a movement ability to get out of the gold you’ve dropped. Try not to LOS your healer on this too, it’s surprisingly easy. Slowly move the boss slightly further back when the boss casts Lure’s Call, and have dps root, stun, slow, and otherwise immobilize and kill the gold. Watch your feet when killing the gold, they drop bad that hurts in the same way as the spit gold. Also watch for Serpentine Gust, you really don’t want to be standing in that on Tyrannical.  

        Mchimba the Embalmer 

            The major mechanic on this fight is Entomb, which can be shadowmelded but all that does is make it switch targets off you. It can put the Entombed player in any of the 4 caskets around the room, so watch for the shaking coffin. Try to have the most movement heavy classes go get them out. This mechanic is easiest with comms, as the person Entombed can call out where they are and then one person can run and get them. Without comms it can be muddled but it generally works out. It’s also important to note that if you don’t get the player out of the casket fast enough, mobs will spawn, and they are the top priority. They hurt the whole group a lot and it’s best if they’re avoided altogether.  

The other two mechanics on this boss are Burn Corruption and Drain Fluids. The former is bad that goes on the ground at a random players’ feet, denoted with a swirly. It’s imperative you do not stand in this effect when it initially goes down, but once it’s down running through it hurts much less. Still try not to run through it, but if you must use movement or defensives and you’ll likely be fine. The latter is an effect that can also be shadowmelded, and will also just switch to someone else. Use defensives if you’re targeted with this, especially if it’s Tyrannical.  

        The Council of Tribes 

            This fight consists of 3 bosses in a random order that cycles each week, much like Freehold’s second boss, except that with this it’s cycling the order they spawn in. I’ll simply go left to right for the purposes of this guide. First is Kula the Butcher. She has two major attacks, one where she’ll channel for a second or two and then axes will swirl out from her, and the other where she’ll target a specific player and cast Severing Axe on them, doing significant bleed damage. Because of the inconvenience of the former (Whirling Axes) and the damage of the latter, this is the boss most will lust and pop cooldowns on. For those with 3-minute cooldowns you can get two uses of them if you want to by using them at the very beginning of this fight. So, if you know this boss will be last feel free to use cooldowns on the first boss that comes out. When dead, the ability this boss casts is Whirling Axes, always from the middle of the room. Because of this, when tanking bosses after her it’s important to keep them out of the middle.  

Next is Zanazal the Wise. He casts 3 major abilities. First is his constant cast, Lightning Bolt. This really doesn’t need a kick unless for some reason the boss is being stubborn and won’t move without a kick. Save kicks for Poison Nova, which if not kicked will do significant damage to the whole party. You can wait a bit on kicking it though, as while he’s alive it’s a very long cast time. When dead, this is the ability that this boss will cast, on a noticeably shorter timer, much more in the realm of 5 seconds. Ranged should be looking out for this ability and kicking it as soon as possible. Melee should also keep an eye out. The final ability is the most complicated from him, Call of the Elements. It spawns 4 totems at 4 corners of the room. All these totems cannot be hurt by certain abilities, such as Eye Beam. My best guess here is that they cannot be hurt by AoE class abilities, but I’m not sure. The Explosive should always be killed first, followed by the Thundering totem. The Torrent and Earthwall totems are of equal importance to get down after that. Only after all the totems are down should you return to damaging the boss.  

Finally, there is Aka’ali the Conqueror. She has two major abilities – Barrel Through and Debilitating Backhand. For Barrel through stack up between the targeted player and the boss before the cast goes off. There is no trick to this other than popping defensives if you feel you’ll need it, or immunity if no one is stacking to save you. You can also shadowmeld this ability, but it will simply go onto someone else immediately. This can be useful for saving your tank from having to deal with another cast of Debilitating Backhand at the end of a fight. The trick if you wish to do that is to wait until it’s about to go off, and then shadowmeld. Then the person after you has the whole cast again, which is a good 5-7 seconds. This Barrel Through ability is what this boss casts after being defeated. Shadowmeld is better used on the Barrel Through after the boss is dead because that will simply end that effect, and it will not transfer to another player. This is best used when Whirling Blades and Barrel Through intersect, making it very hard to stack inbetween the player and the boss.  

Debilitating Backhand knocks your tank back slightly, and then puts a debuff on them which makes any subsequent attacks they receive for the next 7 seconds do 200% damage. If your tank has incredible movement (such as a DH) they can run away for those 7 seconds, and if not one of your melee can taunt swap with the tank to keep the boss from hitting either of them for that timeframe. Sometimes the tank will luck into dodging the attack, thus not getting the Shattered Defenses debuff. If they do not get it, none of these strategies are necessary.  

        Dazar, The First King 

            This boss admittedly has a lot of mechanics, especially compared to the normal dungeon fare of 2-3 things to worry about per boss encounter. His Gale Slash works the same way as the Shadow-Borne Warrior’s Gust Slash, except after he casts it it’ll go around the room gaining speed. It will circle the room constantly, so watch for it coming back around. He will cast Quaking Leap on a certain player, and if they’re not topped up on health on a higher Tyrannical key they will die instantly. Certain classes can cheat this with the correct timing, with DH’s Fel Rush or Hunter’s Disengage, they can jump out of the way just as Dazar jumps towards them. In theory, Druid could also do this with Stag Form and Wild Charge. Blade Combo should be carefully mitigated by the tank and healer on Tyrannical, trading off the tank using big defensives and mitigation and the healer using defensive cooldowns on them like Barkskin. On higher keys Tanks may also have individual trinkets to use as cooldowns on this like Maut or N’Zoth’s tanking trinkets. On Fortified this ability is largely ignorable, with the tank using some small mitigation being largely fine.  

When Dazar reaches 80% health, he will summon Reban, his first raptor. This raptor acts largely like the other raptors in this dungeon, jumping to a player and doing a frontal cone once they get there. It’s important to get this raptor down before Dazar reaches 60% health and summons his next raptor, Tzala. Tzala will periodically cast a fear, and if Reban is still up then it’s quite likely certain players will be feared into the frontal cone and die. The priority target is always the raptor until they’re both dead, and then it’s simply a matter of killing Dazar. In this final phase after the raptors die, Impaling Spears will come down from the ceiling. Watch for swirlies on the ground. There are two patterns to these spears, the first and easier being ones that always start at the gold line to the right of the room, and cascade clockwise around the room. Simply making sure you’re past the golden line when those come out will leave you safe to dps the boss until they come back around, and even then, they will stop just after the gold line. The other configuration is simply triangles of spears that alternate clear and not clear, much like the first two torments in the Xanesh fight in Ny’alotha. Most groups will get the boss down after just a few of these Spears go out. 

(Video to be uploaded later!)

+19 Kings’ Rest, Havoc DH PoV

Atal’Dazar

    Summary: Atal is a dungeon where there are several routes to take. You can shuffle around the first three bosses (Priestess Alun’za, Vol’kaal, and Rezan) however you please, with the most frequent path to take in this patch being going to the Priestess first, then Rezan, and then Vol’kaal. Your tank may change this up as they go through. The Lust order for these tends to be on 1st boss (the pack before her if it’s teeming), 2nd boss and last boss, but there are a lot of different ways to do the trash and bosses for this dungeon so the lust is also up in the air frequently.   

Teeming Route Map, Boss order as Priestess>Voh’kaal>Rezan>Yazma

        Trash Specifics (kind of in order): 

    The Auger will cast Fiery Enchant, this needs to be interrupted or there will be fiery circles on the floor that are hard to dodge. The Priestess will cast a stunnable but not interruptible spell where the person targeted must stand in some bad blood spawned on the floor, or the priestess will heal while sucking life force from them. If they do stand in this properly, the priestess will suck up this bad blood and hurt herself severely. This is the same as the major mechanic on the first boss. Juggernauts will cast an enrage that must be interrupted before it goes off, or soothed after it goes off. The Confessor (who is only in the pack before the first boss on teeming) will cast Bwonsamdi’s Mantle, and if they get that off a healing bubble will go up around the whole pack which the tank must then move the pack out of. In order of importance for the above mechanics, the Bwonsamdi’s Mantle is the most important to interrupt, followed by Fiery Enchant. Because of this, focus the Confessor or the Auger in the teeming pack before the first boss. If it’s not teeming, simply focus the Auger. Honor Guards have no special attacks to interrupt. Any mass silence would do well for this pack before the first boss. 

    An honorable mention must be placed here for the fire staircase, wiping more teams than most bosses. Take the fire slowly, it will one-shot you if you’re not careful. At the bottom of that staircase is a pack with two augers and two honor guards, simply interrupt the Augers and all is well. 

    There are a lot of snap points in Atal, which tanks will frequently use to snap the saurids to keep them from leaping. A leap from a +20 raging saurid will one-shot you, so in higher keys practical use of these snap points is vital. The Feasting Skyscreamers will cast a fear, which it’s very important to interrupt. On teeming there is a 3-pack of Skyscreamers which many opt not to pull. It’s a perfectly safe pull if one dps is assigned to each Skyscreamer and proper communication is used. If your group misses one interrupt here, it’s likely a wipe though. A mass silence would be very useful here too. 

    The middle pack is a complicated one and is often pulled off to the side by someone with shadowmeld or vanish. The trick to pulling this pack to the side is to NOT run headlong into the pack, just get close enough to get aggro and run away as fast as you can (use movement abilities or better yet stay mounted). Then pull as far as you can, making sure you’ve given your tank enough time to enter the obelisk (5-6 secs) before dropping aggro. Your goal is then to hop into the closest portal and meet back up with your group.  

    The Shadowblade Stalker does a bleed effect on your tank, making them impractical to pull with much else most of the time. They’re also invisible until you enter combat with them, but they path in predictable places. You can see them with any ‘see-through-stealth’ ability, hunters’ Flare and DH’s Spectral sight will do nicely, but you don’t have to see them most of the time because there are always predictable amounts of them and they don’t path very far. The Reanimated Honor Guards do a frontal cone that also applies a stacking bleed to its target, making it important to get them down fast or root them and have your tank kite off their stacks. They also have a totem much like Vol’kaal that must be killed before you can do damage to this mob. This mob still applies frontal cone stacks before the totem is broken, and additionally after the totem is broken, they start spewing green bad on the floor which must be avoided. They also blow up upon death, so watch for that.  

The Shieldbearer of Zul will cast two things, shield bash which is the tank ability, and a shield which will protect enemies in its area from our attacks. It’s stunnable and likely any cc’s will work to interrupt too. For DH, Chaos Nova, Fel Eruption, and Imprison all work to stun this effect. Witch Doctors will cast two abilities, one which is interruptible that does some small damage, and a Hex which will turn a selected player into a small dino who must get away from the group before their timer runs out. An important thing to not here is that if the player who is Hex’d is dispelled before they leave the group, it will have the same effect as if the timer runs out. If the player is overlapping their circle with any other players when this goes off, they will all be Hex’d. This is an important interrupt not only for the dps loss but also for the danger to the group not running this out poses. Because of the extreme damage the frontal cone bleed the Reanimated Honor Guards do, most will avoid the pack directly before Voh’kaal. Sometimes to get the the obelisk next to Voh’kaal people will cc one of the Honor Guards, Control Undead if you have a DK, and kill them one at a time to ease up on the tank. You could also simply pull them off to the side in a similar way you would the middle pack.  

        Affixes Effects:  

    Generally, for Atal, of the first two affixes you can have Tyrannical is the more annoying, with Yazma causing problems with spiders that continually spawn during the fight. If you’re going to tackle this dungeon with this affix, it’s important to have good single-target dps cooldowns. For DH, that means single target essences, but I tend to stick with AoE gear (TD and such). If it’s Fortified, just go full AoE. 

Bolstering means you’ll need to watch your dps on the small saurids found in packs with the fearing skyscreamer mobs. Don’t unload on non-elites and watch your cleave. Save big AoE cooldowns for packs with mostly elite mobs. Raging isn’t too much of a concern, the raging saurids can be solved by snap points and having a druid or hunter solves or any other enrages in this place. Try to stagger when you get different adds down to help the tank. Sanguine isn’t too bad in this place either, given there’s a lot of space to move around. You may want a druid with Typhoon or a DK to get out any stubborn mobs casting while standing in sanguine. Teeming doesn’t make or break this dungeon but the pack before the first boss can be concerning and the 3 skyscreamer pack requires deft coordination as mentioned previously. Teeming changes dungeons a lot, but rarely is the death of a group if communication is used. For Bursting we’re back to the saurids, watching when those go down and if necessary, using personal defensives is important. They sometimes leap and kill themselves at inopportune times too, so use caution. Of the level two affixes Bursting and Bolstering are the most concerning for this dungeon. 

Of the level 3 affixes, Necrotic and Grievous both are the worst for most dungeons, this one included. Necrotic requires imaginative kiting, which thankfully there’s enough room in this dungeon to do most of the time. Grievous asks a lot from your healer, and if this is paired with any level two affix that requires a lot from your healer, like Bursting or Raging, you’ll want to watch your own health carefully and use any group-wide damage mitigation you have practically on cooldown. Healers would likely want to take different talents for this kind of run. Skittish can be a problem for some tanks, but that can be solved for with tricks of the trade, misdirect, or simply waiting a bit for them to gather aggro before unloading damage. If your tank is okay with Skittish generally, nothing about this dungeon makes it too much harder. Explosive means no huge pulls, but other than that it’s not too bad for this dungeon. Orbs only spawn near the location of any mobs in combat with someone, so if you group up adds and move them slowly it helps people get down orbs. Explosive can be a concern for places like Temple because of this, but not for this dungeon. Finally, Quaking and Volcanic are basically jokes in this place, just watch your feet. If you have trouble with timing your channeled casts with Quaking, get a weakaura or simply wait until one happens, then Eye Beam your heart out.  

 The Seasonal Affix mini-bosses will be discussed later, but here I will touch on the Obelisk placement. Generally, in all dungeons the Spider will switch with the Blood, and the Tank-Breaker will switch with the Fearing. That’s the extent to which they’ll shuffle though. Obelisk placement in this dungeon allows for a lot of routes to be taken, but often at least one of the obelisks will be accessed by having someone pull the pack in front of it and shadowmeld. This isn’t too bad as there’s good places to run for kiting these packs. I’d say obelisk placement in this place is not incredible, but not horrible either. 

Bosses:

        Priestess Alun’za 

            The basic mechanic for this fight is the same as the Priestess mobs soak. It’s a good idea to watch the DBM timer and start running to your blood pool sooner than the actual ability (Transfusion) starts casting, because you don’t want to run into any gold orbs on your way there even if you do have good movement speed. Also, because if you soak your blood pool too late the boss will heal and especially on Tyrannical the boss killing herself by soaking bad blood from all players does more damage than even the best dps.  

There are two other mentionable mechanics. First, the mob that spawns on the boss at the top of her pedestal, who slowly goes around the room soaking up the blood pools. Because of the importance of everyone soaking a blood pool for the major mechanic on this fight, it’s very important not to let the mob soak any of the pools. This means stunning the mob, RoP, roots, Chaos Nova, basically any cc or snare effects will do. Get the mob down fast and get back on the boss. This mob has very little health compared to the boss, so one stun, snare or slow will likely get the job done if it’s about 3-4 seconds long. The other mechanic on this boss is a consumable ‘gilded claws’ effect on the boss which DHs, Mages, and others with consume magic effects can get rid of. It’s not too important since this boss is generally easy on the tank, and that’s its only real tank ability, but it can help if they’re having trouble for any reason.  

        Rezan 

            Rezan has two major abilities that dps must worry about – Pursuit and Terrifying Visage. The boss is generally positioned with ease of completing these two mechanics in mind. The boss is generally placed hugging one of the large pillars to the side of the stairs, most frequently on the back-right pillar (top-right if you’re looking at the map above). This allows dps to simply run to the sides of the square pillar to LOS the Terrifying Visage fear mechanic. You don’t strictly have to LOS this, with things like a Shaman Totem or DK’s Anti-magic-shell nullifying the effect. If no cooldown is being used though, safe to assume you should LOS the boss. If you must run Pursuit out, run it in a straight line down the water to the next pillar. Beware that after the cast ends naturally if you rush back in and melee attack the boss before the tank has aggro back, there is a bug where he will Devour you anyway. Be patient in getting back into your spot. Most often though, there will be one or several people with shadowmeld. Most often in pugs’ people will meld for themselves and no one else because of a base assumed lack of communication. If you have comms with the people you’re running with though, you can coordinate shadowmelds because they can be used to break anyone out of Pursuit, not just the person casting it.  

The most important thing when being followed with Pursuit is to not be Devoured, but the second most important in how you plan your route if you must run this out is to avoid bone piles on the ground, as those spawn raptors that will conform to trash affixes. This means that they will apply necrotic stacks to your tank, or rage at low percent, or burst when they die, such to the affixes that you’re in that week.  It’s important to note that not only player characters running over bone piles will spawn raptors, Rezan running over them while chasing you will also spawn raptors so watch his feet as well as yours. The path down the water is the easiest to avoid bone piles. Oh, and he does a tail swipe, watch for that. Won’t kill you, just a mild knockback. 

        Vol’kaal 

            This boss is arguably one of the more complicated in this dungeon, having two phases. In the first phase, each damage dealer should focus one of the totems in the corner of the room. This generally takes around 40 seconds, and if you’re doing more damage than the other dps you must throttle, so I’d recommend not popping cooldowns until the 2nd phase. While the dps are doing this, the boss will be hopping around, get out of the green swirl if he jumps on you. He will also periodically cast Noxious Stench, which the tank should the interrupting. If you see it not getting kicked though, do go kick it as it does tremendous party-wide damage.  

Once you’ve gotten the totems down together, we’re into the second phase. Vol’kall will start spewing green bad on the floor and will still cast Noxious Stench but will stop leaping. He must be kited slowly around the outside of the room. Try to be quick on your feet here, don’t stand in any bad for too long. It won’t one-shot you if you must channel something while in it, but it does hurt. Ranged should stand in the middle of the triangle, painting bad around in that area while the tank kites with the melee around the outside. If you did not pull the trash before this boss, do be careful of the gate and give it distance in both the first and second phase. The trash is very much still pullable before, during, and after the boss is pulled, so watch your Twilight Dev. 

        Yazma 

            Yazma has 3 abilities to watch out for – Soulrend, Echoes of Shadra, and Wracking pain. For Soulrend everyone but the tank is targeted with an arrow over their heads and must run away from the boss. It’s generally more important to stack this than run super far away, because then people can stun and AoE them down easier. Try to get as far away from the boss as possible AS A GROUP before it goes off. Then stun/kill the adds. If the adds get to Yazma, they will explode doing a lot of damage to the whole party. Any cc/stun/snare/slow effects will work on these adds.  

Next is Echoes of Shadra, which is WoW’s fancy name for the spiders spawning. They spawn at players feet, in small purple swirlies. The spiders then alternate between being small and roaming randomly and being bigger (with bigger hitboxes) actively pursuing the players. If you collide with a spider they will explode, doing damage to you and leaving bad on the ground. Players with full immunities can run over them and burst them, but this isn’t that good at the beginning of the fight because they will simply spawn more until back to the earlier amount. This can be good at the end of the fight if your party is getting overwhelmed in execute phase and need some breathing room. The best way I’ve found to work with these spiders is to stack with the tank so that the spiders are all following one group. Run out for Soulrend, then get back on the tank for spiders. If your tank knows what they’re doing, it’ll work out fine. 

Finally, Wracking pain is the only interruptible spell that Yazma casts and does a lot of damage to whoever it’s on if it finishes casting. It is imperative to kick this every time it’s up, and that task generally falls to the tank. As with Noxious Stench in Voh’kaal’s fight, if you see a cast getting off do kick it even if you’re not the tank.