(Quick disclaimer before we start: We’re only just barely 3 weeks into having access to these dungeons as I’m writing this, and I didn’t get to do these on the beta like a lot of people who have written other guides. That said, I will be referencing those other guides and trying to be very thorough with what follows. I’m aiming with this to offer a higher level of actionable information and specific tips for certain affixes and situations. I hope I’ve succeeded at least to a certain extent.) 🙂
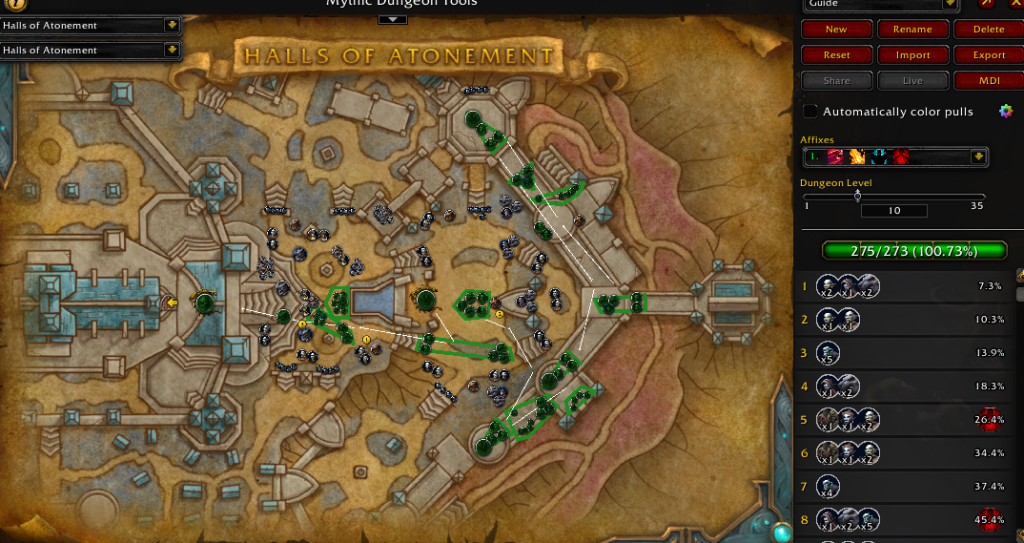
Summary: Much like Motherlode from BfA (at least in 8.3), this dungeon is very front weighted in trash percentage. You need 80% (specifically 79.49%) before going inside after the second boss. Since you’ll want Prideful before the second boss, 80% will do just fine. It doesn’t matter too much how you get this percent, but the route I favor most is linked and shown above. The way I’ve seen this dungeon done best gives you the Prideful buff for the first, second, and last boss. If you have a Venthyr with you, you can use the two Loyal Stoneborns in the third boss’s room to get that boss down. This is accomplished by having the Venthyr mind control (MC) one of the Stoneborn’s, pull the boss, then when that one flies away have a ranged dps tag the other Stoneborn and let the Venthyr MC that one too. This results in having some form of extra dps or buff for all the bosses, which is nice.
Covenant Special:
This dungeon is in Revendreth, meaning Venthyr have a special ability in here. For this dungeon it’s the ability to MC Loyal Stoneborn’s littered through the dungeon for 30 seconds, after which time it will fly off. As mentioned above there are two before the third boss you can use on that one, there are also several around the first boss and the trash surrounding it. You can get some extra dps on bigger trash pulls by MC’ing these, so if you’re Venthyr, go for it!
Trash Specifics (kind of in order):
Depraved Darkblade is the first add in the dungeon and all it can do is a small mostly unnoticeable frontal. It’s not denoted by an animation on the ground, and right now it does so little damage it’s not important. That said I imagine it’ll become more important to dodge as we all move from +10’s more towards +20’s. You can also dodge it as a tank, it won’t move to face you once it starts casting. The Depraved Houndmaster is up next, always in a pack with at least two Vicious Gargons. This is a dangerous pack for your tank for several reasons. First, The Gargons cast bleeds on the tank. Second, the Houndsmaster will sometimes cast Loyal Beasts which enrages the Gargons, making them hurt even more. You can stun or grip the Houndmaster to stop that enrage from casting, but it’s a tight cast (only 1.8 seconds) and if that cast gets off the tank will need to kite. If they do not kite when the enrage goes out they’ll most likely die to the empowered bleeds. Good news is most times you pull that pack there’s ample room to run away. Help your tank with slows or stuns on the Gargons if they get big. The only other ability this pack has is the Houndmaster’s Rapid Fire, which I don’t recall being a big deal or even ever seeing but MDT says it’s there, so I thought I’d mention it. It’s just another frontal cone to watch for on higher keys.
Two Depraved Obliterators are found in a pack with one Depraved Collector and one Shard of Halkias. In MDT they’re linked together, but you can easily pull the two Collectors and then the other two mobs without any fancy tricks. The Collectors have two abilities: Curse of Obliteration and Wicked Bolt. The former should be interrupted if possible but is not the most important cast in this pack if you choose to pull all four. The latter is unimportant and should only really be interrupted if you have nothing better to do or need to stop the mob casting to move it. Depraved Collectors also have two abilities: Siphon Life and Collect Sins. In my experience these are the most important interrupts of the pack, with the latter being only slightly more important than the former. Collect Sins will do some amount of damage and every tick it’s not interrupted will summon an Animated Sin. It’s very easy to get overwhelmed by these Sins when she’s left to summon as much as she wants. Siphon Life is a small damage ability that heals the add. Interrupt it because it heals her. The Shard of Halkias is the last in this pack, with two abilities: Thrash and Sin Quake. Sin Quake puts swirls on the ground where you’re standing – dodge them. Thrash does unavoidable physical damage, once per second for eight seconds. Use minor defensives, but as of writing this it’s not horrible. If there are a lot of mobs up when this goes off it can get dicey though.
Toiling Groundskeepers come in packs of 4-5 and are basically AoE fotter. It’s totally feasible to pull them onto other packs if you have dps that can do big AoE damage. They don’t have anything to interrupt stun, or anything else. Finally, for trash before the first boss, Loyal Stoneborns can be killed for percent (though I don’t recommend it) and they do a frontal cone called Stone Breath. Don’t stand in that (though it won’t hurt you to stand in it if they’re MC’d).
The Stoneborn Reaver will melee sometimes with Reaping Strike, which applies the Stony Veins debuff to everyone within 8 yards. That debuff does noticeable damage and if you get to 10 stacks of it, you’re insta-killed. That means if you don’t have to be in melee, don’t be. The Stoneborn Eviscerator also applies the Stony Viens debuff, though it’s applied by this mob through Eviscerating Dash. This ability is a dash towards a random player, so ranged aren’t safe for this one. For the route I tend towards we don’t pull any occurrences of this mob, but if you must pull these, make sure you have cooldowns. The Stonefiend Anklebiters are in packs of 4-5 and are just the saurids from Atal’Dazar. If you’re not familiar – they leap to a targeted player and will likely hurt a lot on higher keys as we get to those. In Atal we dealt with their jump by snapping them, so I wouldn’t be surprised if someone found a good snap point in here for these at some point. The final new mob before the second boss is the Stoneborn Slasher. This mob does a powerful frontal cone, which also knocks back those hit by it. Only the tank should be hit by this, and they should make sure their back is to a wall so they don’t get knocked into another pack. The Stoneborn Slashers at the bottom of the staircase to the second boss trade off being encased in stone, meaning if you take the one while the other is in stone form you can pull up the stairs and avoid pulling both adds. If you have to run back after a wipe, you can just hug the side of the stairs where there isn’t still a Slasher and get past safely.
The packs before the third boss are not new mobs, but they can be tricky. The first is a pack with two Houndmasters and three Vicious Gargons. The best way I’ve seen this done is to pull LoS that pack around the corner and into the second boss room. This gives your tank room to kite. I would also recommend focusing the Houndsmasters and communicating stuns on Loyal Beasts. Even without that enrage it’s a difficult pack, no need to add to it. The second pack has two Darkblades, a Collector and an Obliterator. Interrupts on the Collector and the Obliterator are important, and there is an additional effect that I’ve seen every time this group is pulled that doesn’t seem to be mentioned in any of the guides I’ve found thus far. There are about four to five orange swirls on the ground that come out when the pack is pulled, and it hurts to stand in them, so watch for that. Not sure which add is casting that ability, but it’s no good to stand in.
The final room after the third boss but before the last boss is essentially a suppression room, much like the eye-puzzle room right before the last boss in Temple of Sethraliss. Inquisitor Sigar is the only mob you technically have to kill here, but there are packs of 6 Tormented Souls in the four corners of the room lined up in the pews. Dark Communion is why you have to kill the adds, as when Sigar channels it he will heal to full by siphoning anima from the Tormented Souls. After siphoning, Sigar will summon as many Manifestations of Envy as the souls he had to drain to get his health back. These Manifestations will occasionally fixate, bring them in to be AoE’d down. There will also be pools of Anguish on the ground that drop from the Manifestations dying. Once all the Tormented Souls are dead you can focus Sigar and kill him.
Affixes Effects:
A lot of dungeons right now are tuned, well, horribly. Hopefully that’ll be fixed at some point, and we’ve already seen a good number of changes go out. That said, of the dungeons out as of writing this, I’d say this is one of the more balanced dungeons. The bosses are possible on Tyrannical, and it’s not like Sanguine Depths where things are being pulled through the walls like it’s the new Tol Dagor. This is actually one of my favorite dungeons right now. It has some kinda tricky trash so do be careful on Fortified. If you do all the mechanics correctly though, it’s a fun and feasible dungeon.
Bosses:
Halkias
This boss will on pull spawn a red circle around itself, I’d say about 25-30 yards in diameter. You have to stay in that circle at all times or you will be feared and die. The boss has two ways to summon Glass Shards, which are red pools on the ground you need to stay out of. He will smash the tank and put Glass Shards beneath their feet, and sometimes Heave Debris to throw Glass Shards pools more at range. After four Glass Shards have gone out, it’s time for the other major mechanic, Refracted Sinlight. He will crouch down and send out four beams in a plus formation from his body, slowly rotating. He can change rotational direction (only once) but doesn’t always, so stay on your toes. If you have to run over Glass Shards to get away from beams, pop a defensive and do so (keep in mind the Glass Shards slow you 30%). Also – I would recommend staying on the outer edge of the circle when the beams are out, even if you’re melee. This gives you more time to react to a sudden change in direction of the beams than trying to get a few hits on the boss in the tiny pie slice between the beams. This general rotation of ‘Throw Glass Shards until casting Refracted Sinlight’ continues until the boss dies.
Echelon
This boss fight starts when you click on the doors at the top of the stairs to go inside. Blood Torrent is his first ability, it’s just a pool on the ground, so watch your feet. About 10-15 seconds into the fight, he’ll call his first wave of adds, 6 Undying Stonefiends that come from the grates at the sides of the room. They’ll run for a moment and then start chain-casting Villainous Bolt, which could benefit greatly from a mass interrupt, stun, or any form of mass grip to get them all in one place. You want them all rather closely stacked as you want to have whoever gets targeted by his next ability, Stone Shattering Leap, to get them all in the circle they’re targeted with. So, interrupt Villainous Bolt, kill the adds fast, and then stop their regenerating by placing Shattering Leap on them. Be careful not to stand in the Leap circle if you don’t have to and be aware that there’s a slow and subsequent stun that goes out called Curse of Stone right before Stone Shattering Leap goes out. If you can dispell, you can take Curse of Stone off the person with Shattering Leap if they’re having trouble getting into position. A new wave of adds comes out every, I’d say 40-50 seconds, so be sure to get the adds down fast as it’s easy to accidentally get overwhelmed. You really want to push the adds to be dead before Leap starts casting.
High Adjudicator Aleez
This boss has a few things to interrupt, and an add she spawns periodically that acts as a soft enrage. She has three spells, only two of which are interruptible. The most important interrupt is Volley of Power, and if you have extra interrupts you can kick Bolt of Power. The third spell she has is called Anima Fountain, which just summons big red swirlies you need to stay out of. The add she spawns is not hittable, it just fixates a chosen player. That player has to run to one of the anima containers in the four corners of the room and stay there until the add gets to the container, at which point it will disappear. This add does pulsing magic damage while active, and it does more damage to those closer to it, so try not to be close to the add even if that means losing dps on the boss for a moment if you’re melee. Your healer will thank you. This is the boss you could use the Venthyr Stoneborn trick on if you wanted to.
Lord Chamberlain
This is definitely the most dangerous boss in this dungeon for an uncoordinated group. Majorly because of Ritual of Woe. But let’s go in order of the abilities he casts. He will do a DoT on the tank that I’ve heard can be nasty. Dps should try to avoid unnecessary damage to let the healer focus on that. Speaking of unnecessary damage: Unleashed Suffering is a frontal cone that should be dodged. There’s also Telekinetic Toss which will throw one of the four statues in the direction of a chosen player. You can see the direction the statue will go by looking at the direction the statue that he’s channeling an anima beam into turns to face. It will go in a straight line from there. A bit into the fight he will do specific combo of abilities:
First, Door of Shadows – He’ll teleport to the middle of the room from wherever he is. Next, Telekinetic Onslaught – he will pull all four of the statues towards him in a square formation. Then Telekinetic Repulsion, sending all four of the statues out in straight lines from the boss. Finally, Ritual of Woe. This is heavy magic damage even if done perfectly. He will try to channel four beams, one towards each statue. The tank and the 3 dps have to soak the four beams, one to each person. Position yourself before the cast goes out in a plus formation, cause if you’re not all in your spots before the cast starts, even one pulse of this thing is enough to cripple your team. Once soaking, if you have any personals use them. However, do not step out of that line – because if you’re not soaking then it will hit the statue and do even more party wide damage likely killing you and your entire party. If you survive that combo then it’s back to all the other abilities, plus a swirlie around the boss’s feet called Erupting Torment that melee have to move out of. You’ll likely get two Ritual of Woe combo’s before killing it on Tyrannical, so time cooldowns accordingly.
If you’ve made it through all that, good job! You now know everything you need to smash your HoA key!