Summary: Kings’ Rest is a very linear dungeon, and thus has very few routes. You can kill everything you come across until the bridge and use the wall trick to activate the bridge and use the two obelisks to skip the entire bridge. Or, you can skip certain constructs at the beginning and on the bridge after the first boss and pull the pack in the middle of the bridge by itself by skipping there with an obelisk. I tend towards the first, as it’s easier and you have to deal with less of certain enemies.
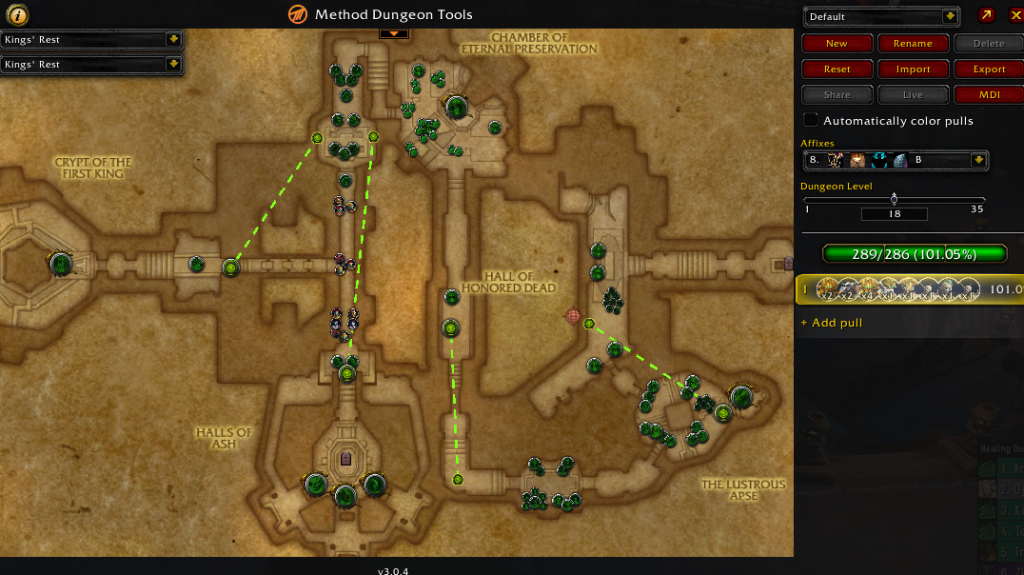
Teeming Route Map
Trash Specifics (very in order):
Before first boss
Animated Guardians will do a frontal cone of lightning called Suppression Slam, which will stun you when it goes off if you stand in it. It does not hurt for you to stand in the crackling lightning on the floor after it goes off, so feel free to dance into that if necessary. The Minions of Zul are small mobs with all their health as a shield that is consumable. Once consumed, they will die instantly. They fear on contact with the player. These do bolster and burst, so watch for that. Bursting is the worst affix for these mobs, given it’s generally a mad rush to get them all dispelled. If you do enough damage to them they will also die – but be mindful of the fear. The second pack of these is in the first boss room and will do a full circle of the boss room starting in the left corner (from the perspective of the balcony looking in) and ending in the same place, briefly pausing in each group of mobs. Watch bolstering or bursting on these, as they will bolster the absolute heck out of the other mobs they’re pulled with if they are pulled with other mobs. It’s best to pull these by themselves and have a solid plan on how to dispel them.
The Shadow-Borne Champion does a frontal block of all damage, hit it from behind to hurt it while this is channeling. It also has an enrage that is not kickable, needing either a sooth or cooldowns on the part of the tank to take the damage. The Shadow-Borne Witch Doctor is constantly casting, mostly Deathly Chill and everyone and a while a Shadow Bolt Volley. Shadow Bolt Volley is the more important interrupt, but the best thing here is to have a kick rotation that stops the Witch Doctor from casting anything if it can be helped. If lacking on interrupts though, make sure Shadow Bolt Volley gets kicked. Mass silence does not work on this mob, if timed right it works as a single-target kick on a very long cooldown. The Shadow-Borne Warrior has only one ability, Gust Slash. This creates a small tornado that swirls in circles on the floor. If you get hit by it, it knocks you out of the way and does not insubstantial damage. On Fortified getting hit by more than two of these in a row is a death sentence, so watch your feet.
Before second boss
There are 4 packs in a room after the first boss, each with their own mini-boss mechanics. They spawn in a random order each week. Queen Patlaa and her Raptor spawn in the far-right corner of the room, from the perspective of walking in the door from the first boss room. Be careful when getting aggro on these two, they seem to become aggroable slightly staggered, so if you’re not careful and meme beam right out of the gate you may get one shot. Give the tank extra time to get aggro on everything in this room. The Queen will shoot and create dark circles on the floor, get out of those if they’re on you. The Raptor will jump around to different people and start channeling a frontal cone called Hunting Leap. Stay away from the front of this Raptor when it’s channeling this, if you stay in this for more than 2 seconds you will die. The next pack is Queen Wasi and King Timalji. The Queen does a constant cast of shadow bolt, which isn’t that important to be interrupted. She also casts Seduction infrequently, taking control of a random player. Stun the player effected but do not kill them. Unlike with the sisters in Waycrest killing your teammate here will not break them out, so leave them be. The King has only one ability, called Bladestorm, with which he pursues a chosen player slowly, doing an AoE attack on his way to them. If you stand in this effect for more than 1 second you will likely die, so be very careful around King Timalji.
Next up is a 3 pack – King Rahu’ai, Seneschal M’bara, and Guard Captain Aru. M’bara will cast a heal called Induce Regeneration on the King, watch for it and kick it. The Guard Captian will cast Axe Barrage, so use a defensive if you get low. Finally, the King will cast Channel Lightning, which will kill you if you stand within 10 yards of him for more than 1-2 seconds. This can be interrupted with anything like Typhoon, Grip, Sigil of Chains, or Ring of Peace. If you aren’t positive someone is going to stop his cast, get out. The final pack in this room is King A’akul and five Bloodsworn Agents. The King casts Hidden Blade, which does noticeable damage to the player it’s on and drops green bad on the floor. The Bloodsworn Agents will periodically cast Shadow Whirl, jumping to a player’s location (denoted with a purple swirlie) and waiting for just a moment before doing an AoE attack there. It’s important to watch your feet on this pack, both for the green the King puts down and the purple swirls that indicate an Agent is going to jump there.
The Purification Construct is found in the hall between the first and second bosses, and on teeming week there’s an extra one in the second boss’s room as well. This construct does Purification Strike, putting bad at the tank’s feet, and Purification Beam, turning in one full circle (always counterclockwise). When faced with the decision to get hit by the Beam or walk through the Strike’s bad on the ground, always walk through the stuff on the floor. The Beam does a DoT that will likely either kill you or test your healers’ patience, both very bad things. The Internment Constructs found in the second boss room will Entomb someone, which is the same mechanic as the boss. If held next to where they spawn, these constructs will always Entomb people in the same casket, the one closest to the entrance wall. It’s important to get people out of their casket quickly, because the Construct will begin casting a party wide AoE spell if they’re not released, called Wail of Mourning.
The final mob to worry about before the first boss is the Embalming Fluid. These blobs will spew out green bad, on people, on the floor, all over the place. Best tactic here is to get aggro on all of these, then kite them slowly while the dps kill them. Any slow effects work wonderfully here, making the kiting of these blobs even. If on Necrotic week some form of RoP, Typhoon or Roots could potentiall be helpful for the tank to get stacks off. These blobs will also drop bad on the ground when they die, which disappears after about a minute or two. The only reason not to chain-pull these mobs is on Bolstering, and even then, if your dps can kill them all generally evenly it shouldn’t be a problem. Pulling style should vary though. For example, on Bursting you should pull 3, wait until they’re all about 25% health, then pull 3 more. Dps should know to focus down the low health adds. If you have no worrisome affixes like those, just chain pull and meme beam your heart out, while of course watching for stuff on the floor.
Before third boss
The Spectral Hex Priest is constantly casting Spectral Bolt, which does noticeable damage to your tank. A mass silence would do nicely here. They also cast Hex, turning a player into a small dino with the same mechanic as the Witch Doctors in Atal’Dazar. Spectral Berserker’s will cast Severing Blade as a stacking bleed on your tank. Because of this you want to focus down the Berserkers anytime there’s a pack with them in it. They will also cast Bloodied Leap, jumping to a player’s location (denoted by a purple swirl) and doing an AoE attack. If you stand in this, you will likely die. Spectral Witch Doctors will cast a Healing Tide Totem, which is only affected by physical attacks and either needs to be outranged or killed or enemies within about 10 yards will be healed over time. The Spectral Brute has only one attack, a ground crush with a very large effect zone. Either dodge in and out of melee with movement effects or stay at range if you can. On Teeming the very first pack in the hallway directly after the second boss should be LOS’d around the corner and killed there to avoid the pathing Brute teeming puts there.
The Spectral Beastmaster and Honored Raptors always come in a pack together. The Raptors will leap at a targeted player and do a frontal cone that does a lot of damage. This ability can be stunned or cc’d, with RoP and Typhoon working wonderfully. The Beastmaster will shoot at the tank, occasionally stopping to use Poison Barrage on a random player. This player should try to make sure no one else is in a line between them and the Beastmaster. Also – if you’re ranged you can out-range this ability at about 15-20 yards. Spectral Headhunters have no special abilities to be worried about, and only really feature in the large pack before the third boss that most don’t pull.
After the third boss there is only the Shadow of Zul, but he is very much not to be trifled with. On Fortified and/or if you have a tank without very good magic damage mitigation (bear, monk) this can be harder than the final boss. He has three major abilities. First is the damage he does to the tank, called Shadow Barrage, which is a stacking magic debuff. Second is a pool someone must soak, generally a ranged player. If not soaked, this does party-wide ticking damage. Third is Dark Revelation, where someone gets a very large fire circle around them and must run to the walls, away from the other party members. When this goes off, they can go back to the boss but do watch for the Minion of Zul that spawns from where they were standing, it’s important to dispel it before it fears someone important like the tank or healer.
Affixes Effects:
For Kings’ Rest of the first two affixes Tyrannical takes the cake. The final boss absolutely destroys tanks. However, Fortified isn’t too much better with the Shadow of Zul hurting almost as much as a Tyrannical Dazar. If it’s Tyrannical, watch the Gold on the first boss, and lust the axe phase on the 3rd boss. If it’s Fortified, you may want to seriously consider lusting Shadow of Zul instead of the 3rd boss. Other notable affixes are Bursting for the Minions of Zul and Bolstering for both the Minions and the Embalming Fluid in the 2nd and 3rd boss room respectively. Teeming doesn’t affect this place too much, just an additional Purification Construct in the 2nd boss room and another Brute in the hallway before the 3rd boss. You can still skip the whole hallway, so it’s not too much of a concern. For Raging focus sooths on any mob that already hit hard, like the Shadow-Borne Champion, and Sanguine just means having Typhoon or some form of Grip or RoP to get stubborn casters out of puddles.
For the 3rd level of affixes there aren’t any that overly affect this dungeon, other than Necrotic being a problem with very little space to kite certain packs, like the last pack I mentioned in the room directly after the 1st boss. Trees or Typhoon are invaluable here. Explosive is the only affix that would change the pulling strategy too much, and even then, it’s only for the 2nd boss room’s Embalming Fluid. You’d probably want your tank to pull in a similar manner to Bursting, pulling 3, waiting until they’re almost dead, and then pulling more. This is to keep the number of orbs that spawn down to a dull roar. You could also just pull all of them and use big cooldowns like Darkness or Tranq, but that’s up to your tank.
Obelisk placement in this dungeon is near-perfect in my opinion, mostly because you don’t have to pull anything you wouldn’t normally pull to get to them. The two obelisks in the hallway allow for many different strategies for that normally troublesome hall. You could probably get away with skipping an obelisk (preferably one of the first two) and doing it with the final boss on Fortified, but on Tyrannical I would advise strongly against it. Just make sure to focus the obelisk boss before the final boss gets to 80% and summons his first raptor, and you’ll be fine.
Bosses:
The Golden Serpent
The major mechanic on this boss is Spit Gold, and where you drop it matters a lot. My best experience on this boss tends towards having the tank hold the boss at the bottom of the stairs of the balcony and having the dps drop gold as far back on the balcony as possible. On Tyrannical I’d recommend using a defensive when dropping gold, it hurts quite a lot. Also, if you need to, use a movement ability to get out of the gold you’ve dropped. Try not to LOS your healer on this too, it’s surprisingly easy. Slowly move the boss slightly further back when the boss casts Lure’s Call, and have dps root, stun, slow, and otherwise immobilize and kill the gold. Watch your feet when killing the gold, they drop bad that hurts in the same way as the spit gold. Also watch for Serpentine Gust, you really don’t want to be standing in that on Tyrannical.
Mchimba the Embalmer
The major mechanic on this fight is Entomb, which can be shadowmelded but all that does is make it switch targets off you. It can put the Entombed player in any of the 4 caskets around the room, so watch for the shaking coffin. Try to have the most movement heavy classes go get them out. This mechanic is easiest with comms, as the person Entombed can call out where they are and then one person can run and get them. Without comms it can be muddled but it generally works out. It’s also important to note that if you don’t get the player out of the casket fast enough, mobs will spawn, and they are the top priority. They hurt the whole group a lot and it’s best if they’re avoided altogether.
The other two mechanics on this boss are Burn Corruption and Drain Fluids. The former is bad that goes on the ground at a random players’ feet, denoted with a swirly. It’s imperative you do not stand in this effect when it initially goes down, but once it’s down running through it hurts much less. Still try not to run through it, but if you must use movement or defensives and you’ll likely be fine. The latter is an effect that can also be shadowmelded, and will also just switch to someone else. Use defensives if you’re targeted with this, especially if it’s Tyrannical.
The Council of Tribes
This fight consists of 3 bosses in a random order that cycles each week, much like Freehold’s second boss, except that with this it’s cycling the order they spawn in. I’ll simply go left to right for the purposes of this guide. First is Kula the Butcher. She has two major attacks, one where she’ll channel for a second or two and then axes will swirl out from her, and the other where she’ll target a specific player and cast Severing Axe on them, doing significant bleed damage. Because of the inconvenience of the former (Whirling Axes) and the damage of the latter, this is the boss most will lust and pop cooldowns on. For those with 3-minute cooldowns you can get two uses of them if you want to by using them at the very beginning of this fight. So, if you know this boss will be last feel free to use cooldowns on the first boss that comes out. When dead, the ability this boss casts is Whirling Axes, always from the middle of the room. Because of this, when tanking bosses after her it’s important to keep them out of the middle.
Next is Zanazal the Wise. He casts 3 major abilities. First is his constant cast, Lightning Bolt. This really doesn’t need a kick unless for some reason the boss is being stubborn and won’t move without a kick. Save kicks for Poison Nova, which if not kicked will do significant damage to the whole party. You can wait a bit on kicking it though, as while he’s alive it’s a very long cast time. When dead, this is the ability that this boss will cast, on a noticeably shorter timer, much more in the realm of 5 seconds. Ranged should be looking out for this ability and kicking it as soon as possible. Melee should also keep an eye out. The final ability is the most complicated from him, Call of the Elements. It spawns 4 totems at 4 corners of the room. All these totems cannot be hurt by certain abilities, such as Eye Beam. My best guess here is that they cannot be hurt by AoE class abilities, but I’m not sure. The Explosive should always be killed first, followed by the Thundering totem. The Torrent and Earthwall totems are of equal importance to get down after that. Only after all the totems are down should you return to damaging the boss.
Finally, there is Aka’ali the Conqueror. She has two major abilities – Barrel Through and Debilitating Backhand. For Barrel through stack up between the targeted player and the boss before the cast goes off. There is no trick to this other than popping defensives if you feel you’ll need it, or immunity if no one is stacking to save you. You can also shadowmeld this ability, but it will simply go onto someone else immediately. This can be useful for saving your tank from having to deal with another cast of Debilitating Backhand at the end of a fight. The trick if you wish to do that is to wait until it’s about to go off, and then shadowmeld. Then the person after you has the whole cast again, which is a good 5-7 seconds. This Barrel Through ability is what this boss casts after being defeated. Shadowmeld is better used on the Barrel Through after the boss is dead because that will simply end that effect, and it will not transfer to another player. This is best used when Whirling Blades and Barrel Through intersect, making it very hard to stack inbetween the player and the boss.
Debilitating Backhand knocks your tank back slightly, and then puts a debuff on them which makes any subsequent attacks they receive for the next 7 seconds do 200% damage. If your tank has incredible movement (such as a DH) they can run away for those 7 seconds, and if not one of your melee can taunt swap with the tank to keep the boss from hitting either of them for that timeframe. Sometimes the tank will luck into dodging the attack, thus not getting the Shattered Defenses debuff. If they do not get it, none of these strategies are necessary.
Dazar, The First King
This boss admittedly has a lot of mechanics, especially compared to the normal dungeon fare of 2-3 things to worry about per boss encounter. His Gale Slash works the same way as the Shadow-Borne Warrior’s Gust Slash, except after he casts it it’ll go around the room gaining speed. It will circle the room constantly, so watch for it coming back around. He will cast Quaking Leap on a certain player, and if they’re not topped up on health on a higher Tyrannical key they will die instantly. Certain classes can cheat this with the correct timing, with DH’s Fel Rush or Hunter’s Disengage, they can jump out of the way just as Dazar jumps towards them. In theory, Druid could also do this with Stag Form and Wild Charge. Blade Combo should be carefully mitigated by the tank and healer on Tyrannical, trading off the tank using big defensives and mitigation and the healer using defensive cooldowns on them like Barkskin. On higher keys Tanks may also have individual trinkets to use as cooldowns on this like Maut or N’Zoth’s tanking trinkets. On Fortified this ability is largely ignorable, with the tank using some small mitigation being largely fine.
When Dazar reaches 80% health, he will summon Reban, his first raptor. This raptor acts largely like the other raptors in this dungeon, jumping to a player and doing a frontal cone once they get there. It’s important to get this raptor down before Dazar reaches 60% health and summons his next raptor, Tzala. Tzala will periodically cast a fear, and if Reban is still up then it’s quite likely certain players will be feared into the frontal cone and die. The priority target is always the raptor until they’re both dead, and then it’s simply a matter of killing Dazar. In this final phase after the raptors die, Impaling Spears will come down from the ceiling. Watch for swirlies on the ground. There are two patterns to these spears, the first and easier being ones that always start at the gold line to the right of the room, and cascade clockwise around the room. Simply making sure you’re past the golden line when those come out will leave you safe to dps the boss until they come back around, and even then, they will stop just after the gold line. The other configuration is simply triangles of spears that alternate clear and not clear, much like the first two torments in the Xanesh fight in Ny’alotha. Most groups will get the boss down after just a few of these Spears go out.
(Video to be uploaded later!)
+19 Kings’ Rest, Havoc DH PoV